Wednesday, December 30, 2020

BALDWIN-BURNS: Buzzaround, Tag Board Layout

This is my slightly more spacious take on the original tagboard layout for the Baldwin-Burns Buzzaround.   Same size board and the same layout; it's just spread out a bit more to take advantage of all the lugs available.  


BALDWIN-BURNS BUZZAROUND - TAGBOARD LAYOUT

BALDWIN-BURNS BUZZAROUND - TAG BOARD LAYOUT


Tuesday, December 29, 2020

JOHN HORNBY SKEWES: Zonk Machine

The Hornby Skewes Zonk Machine is pretty much a MKI Tone Bender with some value changes - most notably the 1n capacitor on the input and resistors to collectors.

A classic guitar effect from back in the day.

HORNBY SKEWES ZONK MACHINE - ORIGINAL TAG BOARD LAYOUT

HORNBY SKEWES ZONK MACHINE TAG BOARD VINTAGE GUITAR EFFECT LAYOUT


TAG BOARD LAYOUT

There's enough room on a 12-lug tag board for all the components, so here it is...   probably worth adding an electrolytic from V+ to V- somewhere too.  Just keep in mind that you will need to leave room for mounting screws at either end, so bend around the holes a little.

I didn't include all the wiring - as you can see, there needs to be a few jumpers to connect V- and grounds.  I left them off to make it easier to read, assuming that people can work out what goes where on their own.  

HORNBY SKEWES ZONK MACHINE - TAG BOARD LAYOUT


Photos care of effects database.


Wednesday, December 23, 2020

WEDGE ENCLOSURE: Finishing Enclosure #1, Dark Grey Hammerite

I bought a couple of these enclosures on e-bay, not being completely sure what they would be like, but I'm pretty happy with them.  They feel solid, and the tolerances are good (no big gaps, and everything fits nicely).  The corners are a bit sharp, but nothing a file can't sort out before finishing.


VINTAGE-STYLE WEDGE ENCLOSURE DIMENSIONS


vintage wedge enclosure with dimensions


vintage wedge enclosure open


DRILLING THE ENCLOSURE

Drilled and ready to be prepped for painting.  Being steel, this is harder to work with than Hammond style aluminium enclosures - it takes a bit more effort to drill, and pilot holes are a must.  


PAINT - HAMMERED FINISH

Two light coats at the start and one a bit heavier at the end.  If you don't apply a decent coat at the end, the hammered finish doesn't appear.


The actual colour is slightly darker than the cap, but that's fine.


APPLYING GRAPHICS ON THE ENCLOSURE - WATERSLIDE DECAL

The decal application was more successful than my last attempt using a different product (that was on a Tone Bender enclosure).  I used an ultra-thin decal this time.  It's not perfect, but it's close enough for me. 


FINAL CLEARCOAT COVER

First coat of clear coat, and it's coming up well.  The edges of the decal are still slightly visible, but it's very hard to see.   Another coat will probably sort that out.


Second coat - it's hard to see the edge of the decal now.  Coming up well.


FINISHED ENCLOSURE WITH HARDWARE

As the name on the box suggests, it's a D*A*M Red Rooster that I made using a point-to-point layout.   I was considering not using the name on the box, but decided to run with it anyway.  


Wednesday, December 16, 2020

TONE BENDER ENCLOSURE: Finishing Enclosure, Yellow

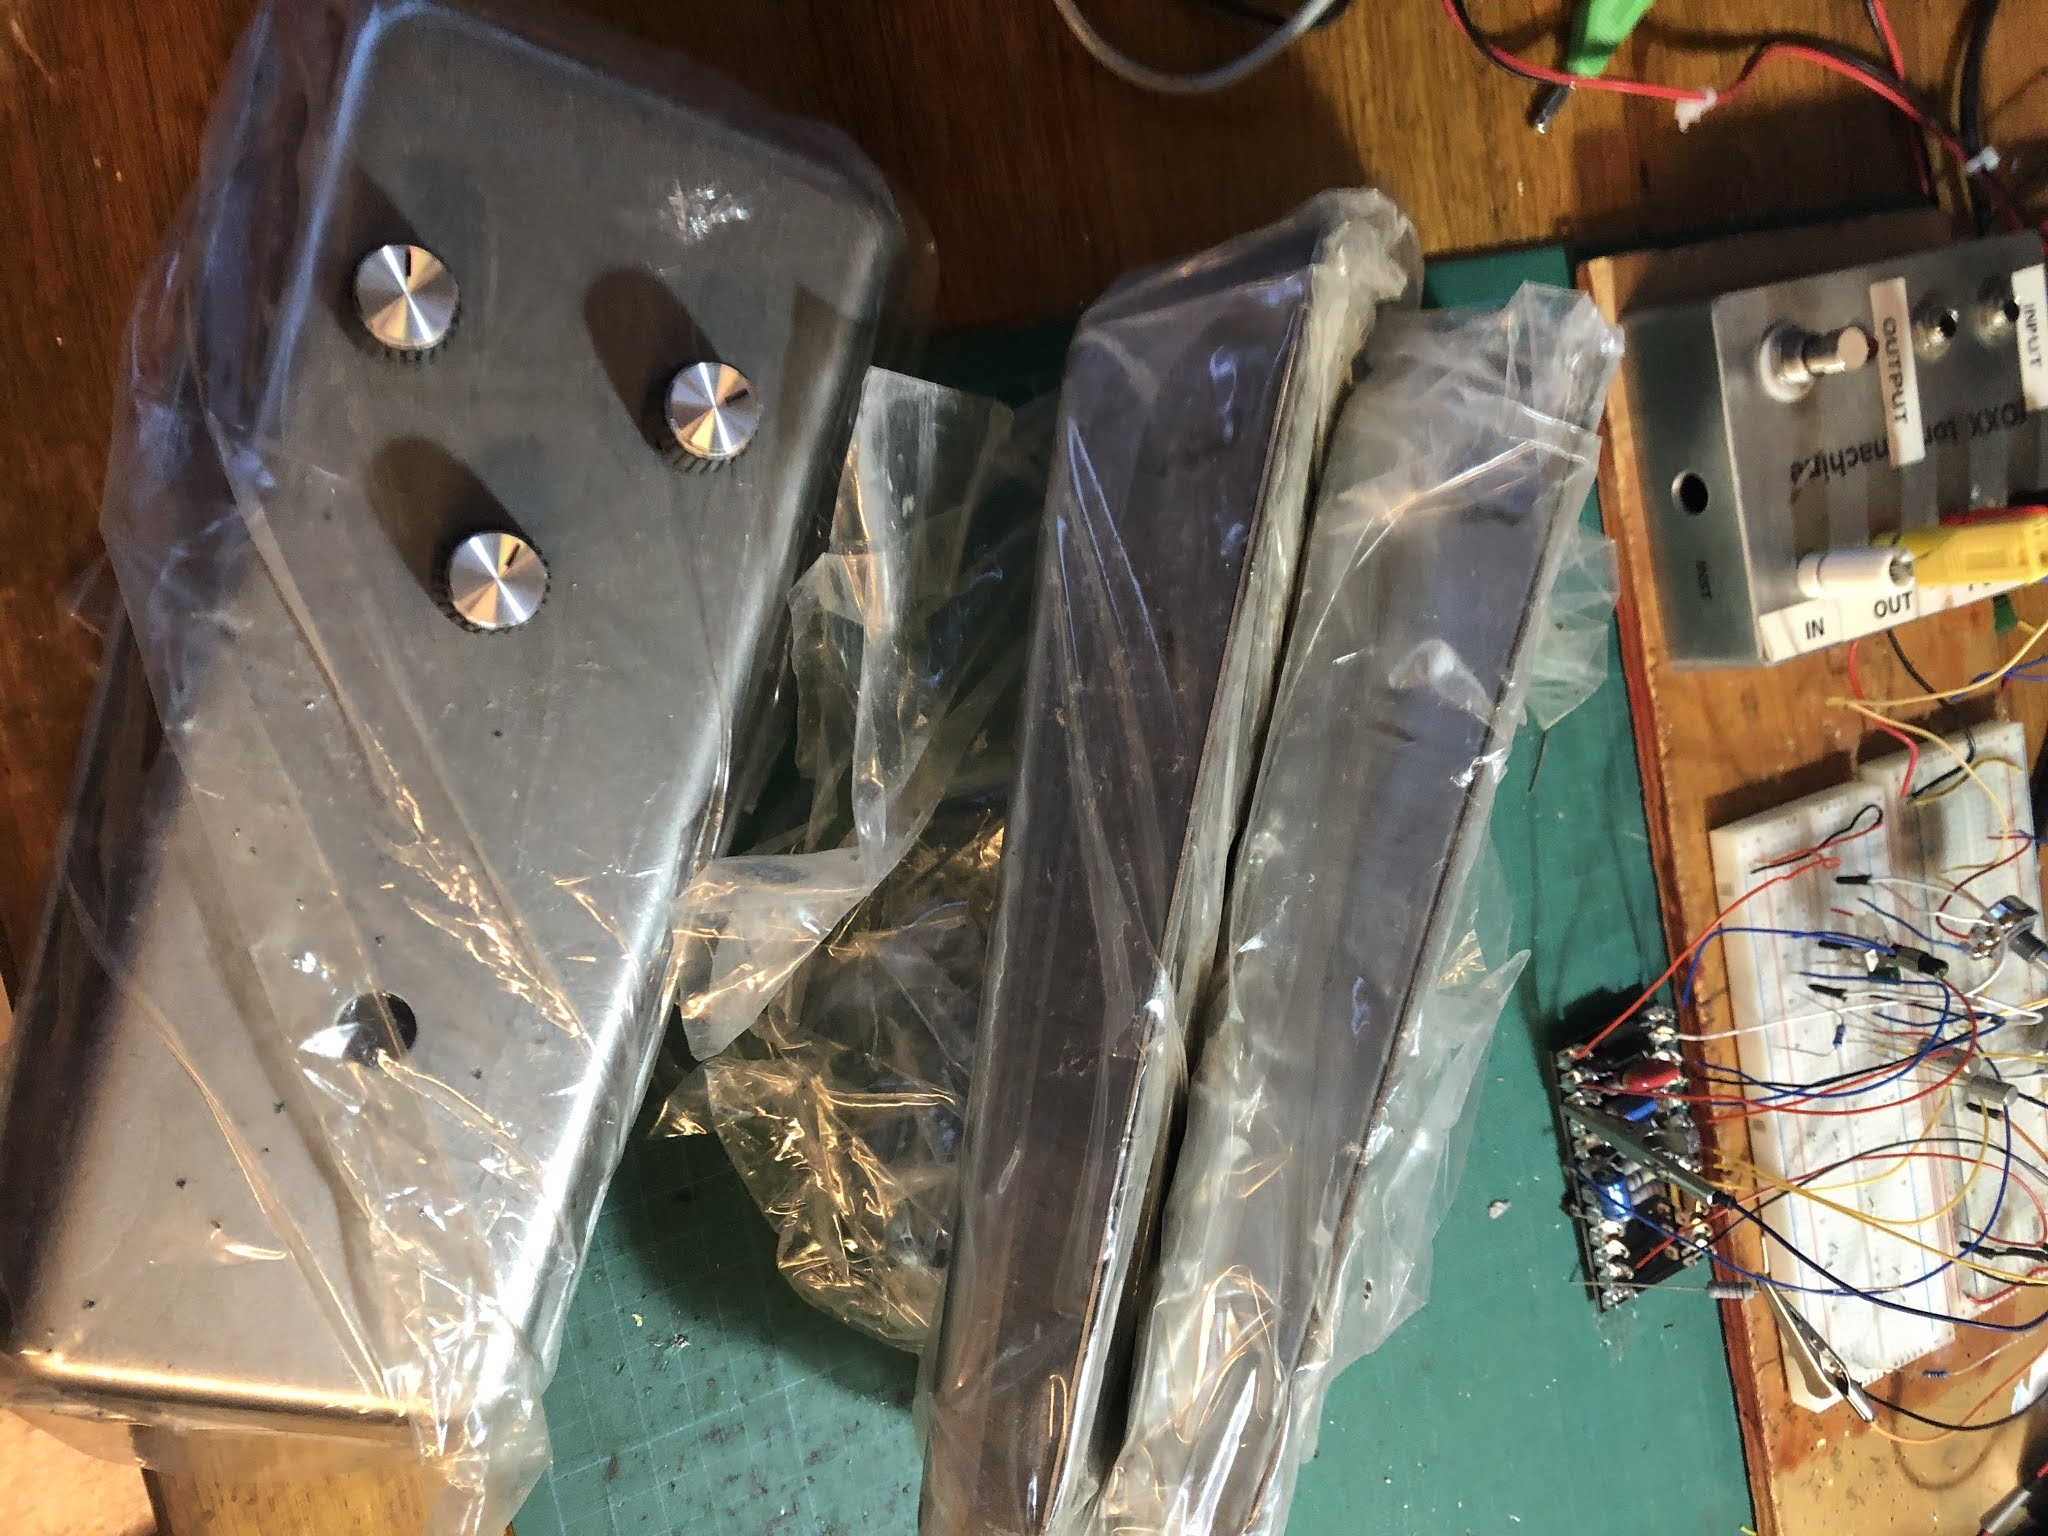
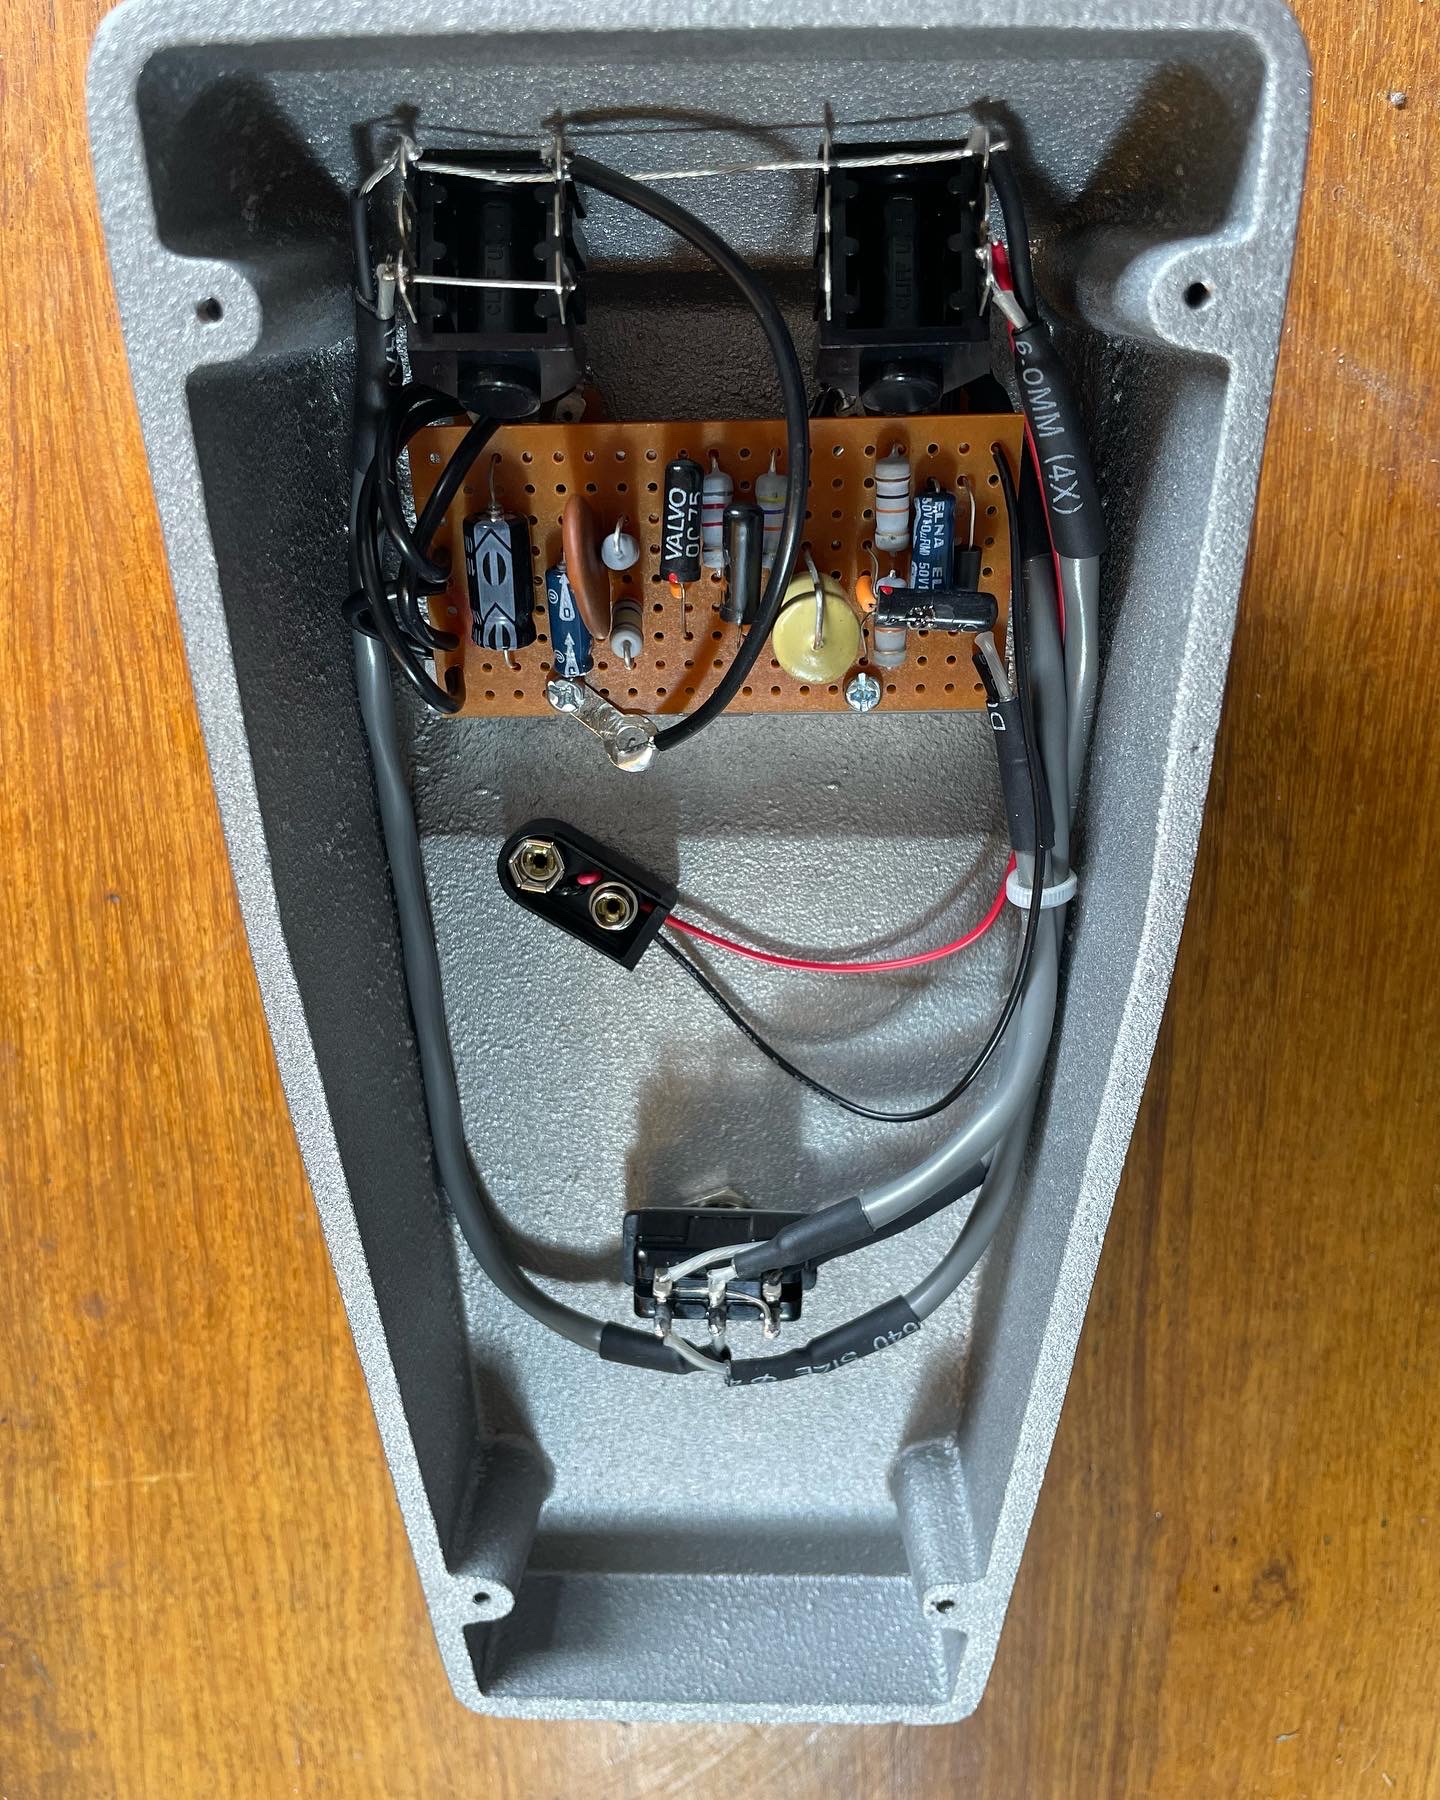
Finally found a few vintage-style enclosures for some Tone Bender MKIII / MKIV circuits that I’ve built and had sitting around waiting for the right enclosure.  Can’t wait to clean these up and get them up and running - currently wrapped in plastic and covered in oil, as they are raw steel after all.

I'll try and document my success and/or failures finishing these (I've never done steel before).  Thinking of running with a polish and clear coat on one, and maybe a bit of bright colour on the other two.  

Here's the finished product - it's D*A*M Fuzz Sound MKIII.  I like yellow so much I made two.


ROTOSOUND FUZZ / VOX STYLE TONE BENDER ENCLOSURES


Yes, I know - it's technically not a Sola Sound Tone Bender enclosure, it's more like a Rotosound Fuzz or a Vox Tone Bender, but it's as close as I could get.


Painting:  Just getting a couple of light coats on.  Ignore the patchy bits; they’re mostly shadows. I’m trying some automotive spray paint, as I’m assuming it should be hard-wearing, and the colour is pretty cool (so long as you like yellow).  

I’ve patched up the extra holes with epoxy, and they should be covered by the pots and knobs anyway (these are to secure the pots using those little tabs that are usually broken off)  

The automotive paint needs some time to cure, and don't go too heavy on the coats.  More is not better...  


For the base, I decided to use a clear coat, which is the same as what I normally do on hammond-type enclosures after applying waterslide decals.  

STEPS FOR PAINTING THE ENCLOSURE

  • wash in hot water with detergent to remove oil (dry it very quickly to avoid rust)
  • sand with 400 grit wet and dry, followed by 800 and finally 1200 (in the same direction)
  • wash again in hot water with detergent, then wipe down with paper towels and isopropyl alcohol (again, don't waste time, or this will rust before your eyes)
  • apply two coats on one side, wait an hour, then on the other side.  Repeat.  


Saturday, December 12, 2020

D*A*M: Fuzzrong FR-70, Schematic


D*A*M Fuzzrong FR-70 schematic


D*A*M: Fuzzrong FR-70, 0.15" Vero Layout

Unlike the D*A*M Fuzzrong FR-69, which is very much a straight germanium Fuzzrite, the D*A*M Fuzzrong FR-70 is a little different.  

It's a version of the Rosac Nu-Fuzz, which was designed by Ed Sanner, the designer of the Fuzzrite.  There are a some changes with component values, but you are basically looking at the bones of Nu-Fuzz.

It uses very common transistors - so there is no hunting for expensive/rare germanium only to find out they sound 95% like the ones you already have...  


D*A*M FUZZRONG FR-70 - VERO LAYOUT (ORIGINAL D*A*M LAYOUT)

D*A*M FUZZRONG FR-70 - GUITAR EFFECT VERO LAYOUT


I altered the layout a little to add a cap for the power supply - also changed the small cap across Q1 to 1n to help reduce noise, and it was a tad bit bright for my liking.   It’s a really solid sounding circuit.  


NU-FUZZ vs FR-70


ROSAC NU-FUZZ vs D*A*M FR-70


This is swapping the tone/depth pots - similar, but the FR-70 has less bottom end.  

ROSAC NU-FUZZ vs D*A*M FR-70

AND HERE'S A CLIP FROM ONE OF MY YOUTUBE FUZZ FAVES


Thursday, December 10, 2020

D*A*M: FUZZrong FR-69

This is the layout that D*A*M used for the Fuzzrong FZ-69, which is essentially a germanium Fuzzrite.

I couldn't make out the pot values or the 2n2 cap values on the photos I could find, so will have to take this at face value.  

D*A*M FUZZRONG FR-69 - VERO LAYOUT

D*A*M FUZZRONG FR-69 - VERO LAYOUT


Wednesday, December 9, 2020

D*A*M: Buzzotron, Schematic

 D*A*M BUZZOTRON - EARLIER VERSION SCHEMATIC

D*A*M BUZZOTRON - EARLIER VERSION SCHEMATIC


D*A*M BUZZOTRON - LATER VERSION SCHEMATIC

27k instead of 22k resistor to Balance pot and 33k instead of 10K resistor from 1n on the Attack control to ground (lowering the filter frequency)

D*A*M BUZZOTRON - LATER VERSION SCHEMATIC


Monday, December 7, 2020

MARSHALL: SupaFuzz, 0.15" Vero Layout

This is the original 1968 0.15" vero layout for the Marshall SupaFuzz (which may be disputed by some).  

The cuts may not be in the exact positions as the original, but no matter...  same with Filter pin 3 connection.  This may be on the other side of the board, but that makes no real difference.  I have not included shielding, but that's easy enough to work out from the photo.  


MARSHALL SUPAFUZZ - VERO LAYOUT

MARSHALL SUPA FUZZ - VERO LAYOUT


MARSHALL SUPAFUZZ - ORIGINAL BOARD


MARSHALL Supa Fuzz - original board


MARSHALL SUPAFUZZ - ON THE BENCH


MARSHALL: SupaFuzz, Schematic


Saturday, November 28, 2020

D*A*M: Tone Bender TB-00, 0.15" Vero Layout

The D*A*M TB-00 Tone Bender is Vox Tone Bender with a minor variation on the original.  

Strangely the input capacitor on this layout is hidden under the board, so I guessed the value.  Likely to be the same as the original (150n) or a 220n like the '66.  No idea why it's hidden - some were under the board on originals, so maybe that's why?  

Anyways, had me confused for a while trying to work out what was going on while working on the layout.


D*A*M TONE BENDER TB-00   |   0.15" VERO LAYOUT

D*A*M TONE BENDER TB-00


TB-00 VIDEO DEMO